Coconut Cream Pie Cupcakes
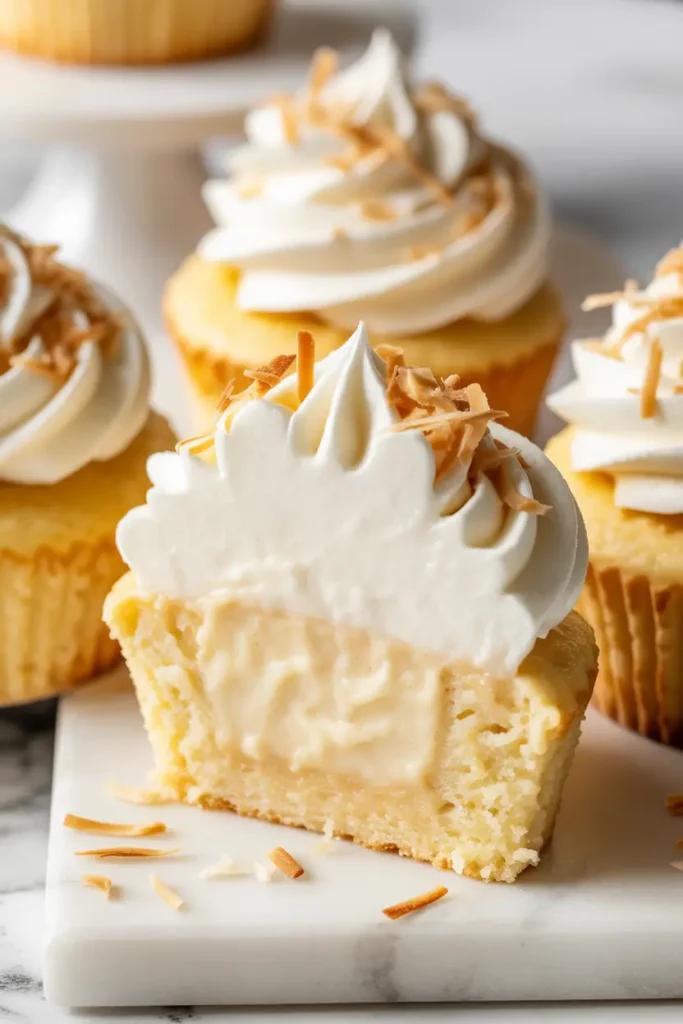
Let’s be honest, sometimes a whole pie feels like a bit much. That’s where the idea for these cupcakes was born. I wanted to capture all that classic flavor in a perfect, single-serving treat.
Imagine a tender vanilla cupcake, a surprise pocket of creamy coconut filling hidden inside, and a swirl of stabilized whipped cream on top, all dusted with golden toasted coconut. It’s the pie experience, reimagined.
Each bite is a little journey. You get the soft cake, the luscious cream, and the nutty crunch of the toasted coconut. They’re elegant enough for a party but simple enough to bake on a whim. This recipe breaks it all down, step by step, so you can bring this little piece of heaven to your own kitchen.
What You’ll Need
Here are the components, broken down for clarity. Gathering everything first makes the process smooth and enjoyable.
For the Vanilla Cupcakes:
- 1 1/2 cups all-purpose flour
- 1 1/2 teaspoons baking powder
- 1/4 teaspoon salt
- 1/2 cup unsalted butter, softened
- 1 cup granulated sugar
- 2 large eggs, at room temperature
- 1 teaspoon vanilla extract
- 1/2 cup whole milk, at room temperature
For the Coconut Cream Filling:
- 1/2 cup granulated sugar
- 1/4 cup cornstarch
- 1/4 teaspoon salt
- 2 large egg yolks
- 1 (13.5 ounce) can full-fat coconut milk
- 1/4 cup whole milk
- 1 teaspoon vanilla extract
- 1/2 cup sweetened shredded coconut, toasted
For the Whipped Cream Frosting:
- 1 1/2 cups heavy whipping cream, very cold
- 1/2 cup powdered sugar
- 1 teaspoon vanilla extract
- 2 tablespoons instant vanilla pudding mix (the secret ingredient!)
- Extra toasted coconut for garnish
“The key to the best flavor is toasting the coconut. It transforms from chewy and sweet to nutty and crisp, adding a whole new dimension.”
Tools Required for Success
- Muffin tin
- Cupcake liners
- Electric mixer (stand or hand-held)
- Mixing bowls
- Whisk
- Medium saucepan
- Spatula
- Measuring cups and spoons
- Piping bag and tip (like a Wilton 1M)
- A small knife or apple corer (for hollowing cupcakes)
Pro Tips for Perfect Cupcakes
I’ve made these dozens of times, and I’ve picked up a few tricks along the way that make a real difference.
- Don’t Skip Toasting the Coconut: This is my number one tip. Spreading shredded coconut on a baking sheet and toasting it at 350°F (175°C) for 5-7 minutes until it’s golden brown deepens the flavor immensely. Watch it closely, as it can burn fast!
- The Secret to Stable Whipped Cream: Adding a little instant vanilla pudding mix to your whipped cream is a game-changer. It acts as a stabilizer, preventing the cream from weeping or deflating, even after a day in the fridge.
- Chill the Filling Completely: Your coconut cream filling needs to be thoroughly chilled before you put it in the cupcakes. If it’s even slightly warm, it can make the cupcakes soggy. Patience is your best friend here; give it at least 2-3 hours in the fridge.
- Room Temperature Ingredients are a Must: For the cupcake batter, having your butter, eggs, and milk at room temperature helps them emulsify. This creates a uniform structure and a tender, even crumb in the final product.
Step-by-Step Instructions
Let’s break this down into manageable parts. We’ll start with the filling, then the cupcakes, and finish with the frosting and assembly.
Part 1: Making the Coconut Cream Filling
Step 1: In a medium saucepan, whisk together the sugar, cornstarch, and salt. This prevents the cornstarch from clumping when you add the liquids.
Step 2: In a separate bowl, whisk the egg yolks. Slowly whisk in the coconut milk and whole milk until smooth.
Step 3: Gradually pour the milk mixture into the saucepan with the sugar mixture, whisking constantly. Cook over medium heat, stirring nonstop, until the mixture thickens and comes to a boil. This can take about 6-8 minutes.
Step 4: Once boiling, continue to cook and stir for one more minute to ensure the cornstarch is fully activated. Remove from the heat.
Step 5: Stir in the vanilla extract and the toasted shredded coconut. Pour the filling into a bowl, press a piece of plastic wrap directly onto the surface to prevent a skin from forming, and refrigerate until completely cold (at least 2-3 hours).
Part 2: Baking the Vanilla Cupcakes
Step 1: Preheat your oven to 350°F (175°C) and line a 12-cup muffin tin with liners.
Step 2: In a medium bowl, whisk together the flour, baking powder, and salt. Set it aside.
Step 3: In a large bowl, using an electric mixer, beat the softened butter and granulated sugar together on medium-high speed until light and fluffy, about 3-4 minutes.
Step 4: Beat in the eggs one at a time, mixing well after each addition. Then, mix in the vanilla extract.
Step 5: Reduce the mixer speed to low. Add the flour mixture in three parts, alternating with the milk in two parts, beginning and ending with the flour. Mix only until just combined; do not overmix.
Step 6: Fill the cupcake liners about two-thirds full. Bake for 18-22 minutes, or until a wooden pick inserted into the center comes out clean. Let them cool in the pan for a few minutes before transferring to a wire rack to cool completely.
| Component | Prep Time | Cook/Chill Time |
|---|---|---|
| Filling | 10 mins | 3 hours (chilling) |
| Cupcakes | 15 mins | 20 mins (baking) |
| Frosting & Assembly | 15 mins | N/A |
Part 3: Whipping the Frosting & Assembling
Step 1: Once the cupcakes are completely cool and the filling is cold, it’s time to assemble. Use a small knife or an apple corer to remove the center of each cupcake, creating a small well. Don’t go all the way to the bottom.
Step 2: Spoon the chilled coconut cream filling into each cupcake well, filling it to the top.
Step 3: To make the frosting, pour the very cold heavy cream into a chilled mixing bowl. Add the powdered sugar, vanilla extract, and the instant pudding mix.
Step 4: Beat on low speed to combine, then increase to high speed and whip until stiff peaks form. Be careful not to overwhip, or it will turn grainy.
Step 5: Transfer the frosting to a piping bag fitted with your desired tip. Pipe a generous swirl onto each filled cupcake.
Step 6: Garnish with a sprinkle of extra toasted coconut. Refrigerate the cupcakes until you are ready to serve.
Substitutions and Variations
Want to mix things up? Here are a few ideas.
- Gluten-Free: You can substitute the all-purpose flour with a good quality 1-to-1 gluten-free baking flour blend.
- Dairy-Free: Use a plant-based butter substitute and a dairy-free milk alternative like almond or oat milk in the cupcakes. For the filling, ensure you’re using a dairy-free milk. The frosting is tricky, but you can use a frosting made from chilled full-fat coconut cream (the solid part from the can).
- Different Extract: Try adding a 1/4 teaspoon of coconut extract to the cupcake batter for an even more intense coconut flavor.
Make-Ahead Tips
Planning for a party? You can easily prep parts of this recipe in advance.
- The coconut cream filling can be made up to 2 days ahead and kept in an airtight container in the refrigerator.
- The cupcakes can be baked one day in advance. Store them in an airtight container at room temperature.
- For the best results, assemble and frost the cupcakes on the day you plan to serve them.
| Nutrient | Approximate Value |
|---|---|
| Calories | 380 kcal |
| Carbs | 45g |
| Fat | 22g |
| Protein | 4g |
Note: Nutritional information is an estimate and can vary based on the specific ingredients used.
Meal Pairings & Efficiency
These cupcakes are a wonderful dessert after a light meal, like grilled chicken salad or a simple fish dish. They pair beautifully with a hot cup of coffee or a delicate black tea, which helps cut through the richness.
To be efficient, make the filling first. While it chills, you can bake and cool the cupcakes. This streamlines the process and makes the assembly feel quick and easy.
Leftovers and Storage
Because of the cream filling and whipped cream frosting, these cupcakes must be stored in the refrigerator.
Place them in an airtight container with enough height so the frosting isn’t squished. They will stay fresh for up to 3 days. The toasted coconut garnish may soften slightly over time, but they’ll still be delicious.
Frequently Asked Questions
Q1. Why is my coconut filling runny?
Ans: This usually happens for two reasons. First, the mixture may not have been cooked long enough to fully activate the cornstarch. You must bring it to a full, rolling boil and cook for one minute. Second, it wasn’t chilled completely before using. It needs to be cold and set.
Q2. Can I use light coconut milk?
Ans: I strongly recommend using full-fat coconut milk for the filling. The fat content is crucial for creating that rich, creamy texture. Light coconut milk will result in a much thinner, less satisfying filling.
Q3. Can I freeze these cupcakes?
Ans: It’s best not to freeze the fully assembled cupcakes. The whipped cream frosting and the filling don’t freeze and thaw well; their textures can become watery and separated. However, you can freeze the unfrosted, unfilled cupcake bases for up to a month in a freezer-safe bag.
Wrapping Up
There you have it—the joy of a coconut cream pie, all wrapped up in a delightful little cupcake. They’re a true crowd-pleaser and a fun baking project that delivers a fantastic result.
Don’t be intimidated by the different components; each step is simple on its own. The final product, with its layers of flavor and texture, is so worth the effort.
I hope you give this recipe a try! If you do, I would love to hear about your experience. Drop a comment below with how they turned out or if you have any questions.

