I’ll be honest, my first attempt at a baked cheesecake was a disaster. It was a cracked, weeping, rubbery mess. I almost gave up on them entirely, thinking they were some magical dessert only professional bakeries could master.
But I’m stubborn. I spent years tinkering, testing, and frankly, eating a lot of mediocre cheesecake. I learned that the secret isn’t magic. It’s about a few key techniques that anyone can master.
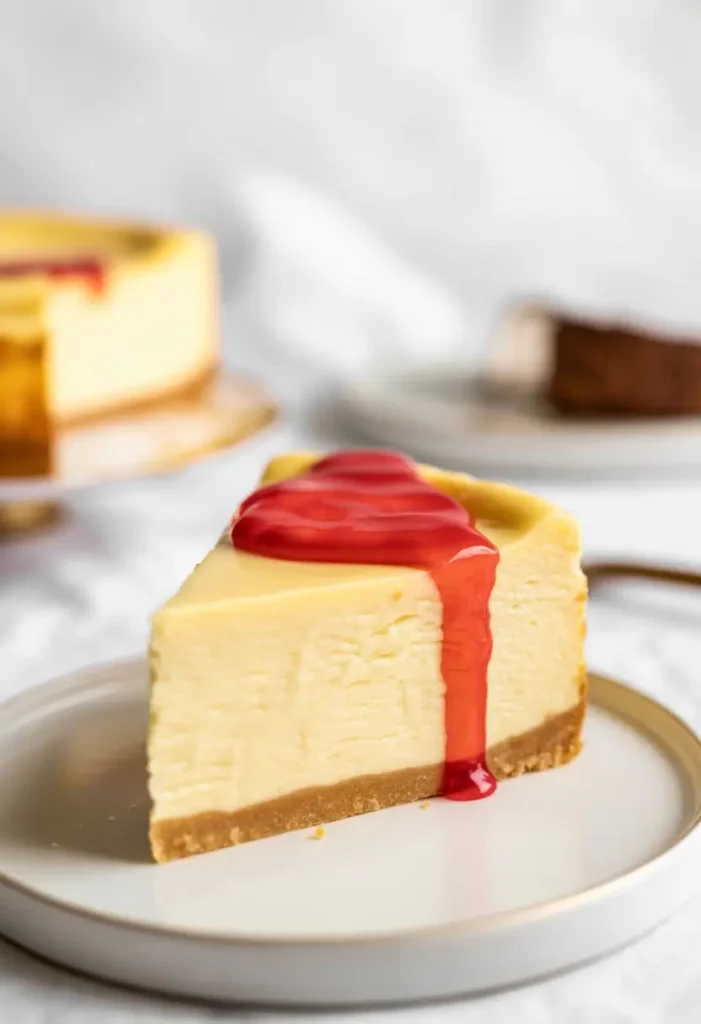
This recipe is the result of all that trial and error. It’s a roadmap to a cheesecake that is unbelievably creamy, rich, and dense, with a velvety texture that melts in your mouth. And best of all? No cracks.
Forget the bakery. Let’s make the best cheesecake of your life, right in your own kitchen.
What You’ll Need
The ingredient list is simple, but the quality and temperature of these items are what make a huge difference. Don’t skim this part!
For the Graham Cracker Crust:
- 1 1/2 cups graham cracker crumbs (about 10 full sheets)
- 1/4 cup granulated sugar
- 6 tablespoons unsalted butter, melted
For the Cheesecake Filling:
- 32 ounces (four 8-ounce blocks) full-fat cream cheese, at room temperature
- 1 1/2 cups granulated sugar
- 1 cup full-fat sour cream, at room temperature
- 1 teaspoon pure vanilla extract
- A pinch of salt
- 4 large eggs, at room temperature
Required Tools
Having the right equipment is half the battle. Here’s what you should have on hand before you start.
- 9-inch springform pan
- Large roasting pan (for the water bath)
- Electric stand mixer or a powerful hand mixer
- Large mixing bowls
- Spatula
- Measuring cups and spoons
- Aluminum foil
Pro Tips for a Perfect Cheesecake
These are the non-negotiable tips I learned the hard way. Follow these, and you’ll avoid the common pitfalls of cheesecake baking.
1. Room Temperature is King: I cannot stress this enough. Your cream cheese, sour cream, and eggs absolutely must be at room temperature. Cold cream cheese is the number one cause of lumpy cheesecake because it doesn’t blend smoothly. Let everything sit out on the counter for at least 2 to 3 hours before you begin.
2. Embrace the Water Bath: It sounds fussy, but a water bath (or bain-marie) is your secret weapon against cracks. It creates a humid, steamy environment in the oven, which allows the cheesecake to bake gently and evenly. It also prevents the top from drying out and cracking as it cools.
3. Don’t Overmix the Eggs: Mix the batter on low speed once you add the eggs. You want to incorporate them until they are just combined. Overmixing whips too much air into the batter, which causes the cheesecake to puff up in the oven and then fall and crack as it cools.
4. Cool it Down Slowly: Drastic temperature changes are another enemy of cheesecake. The slow cooling process (in the turned-off oven, then on the counter, then in the fridge) is crucial. This gradual cooldown prevents the cheesecake from shrinking too quickly and forming cracks.
How to Make Creamy Baked Cheesecake: Step-by-Step
Let’s get down to business. Follow these steps precisely for a flawless result.
Step 1: Prep Your Oven and Pan
Preheat your oven to 350°F (175°C). Take your 9-inch springform pan and wrap the outside bottom and sides with a few layers of heavy-duty aluminum foil. Make sure it’s completely sealed to prevent any water from seeping in during the water bath.
Step 2: Make the Crust
In a medium bowl, combine the graham cracker crumbs and sugar. Pour in the melted butter and mix with a fork until all the crumbs are moistened. The texture should be like wet sand. Firmly press the mixture into the bottom and slightly up the sides of your prepared springform pan. Use the bottom of a glass or measuring cup to pack it down tightly.
Step 3: Bake the Crust
Bake the crust for 10 minutes. This helps it set and prevents it from getting soggy later. Once baked, remove it from the oven and place it on a wire rack to cool slightly while you prepare the filling. Reduce the oven temperature to 325°F (160°C).
Step 4: Start the Filling
In the bowl of a stand mixer fitted with the paddle attachment (or using a hand mixer and a large bowl), beat the room temperature cream cheese on medium-low speed until it’s completely smooth and creamy. Scrape down the sides and bottom of the bowl often. This step is key to avoiding lumps.
Step 5: Add Sugar and Flavors
With the mixer on low, gradually add the granulated sugar. Once combined, mix in the sour cream, vanilla extract, and salt. Continue to beat on low until everything is smooth, remembering to scrape the bowl a couple of times.
Step 6: Add the Eggs
Add the room temperature eggs one at a time, mixing on low speed only until the yellow yolk disappears. Do not overmix here! This is the most important part to prevent a cracked top.
Step 7: Assemble for Baking
Pour the cheesecake batter over your pre-baked crust and smooth the top with a spatula. Place the foil-wrapped springform pan into the large roasting pan. Bring a kettle of water to a boil.
Step 8: The Water Bath and Baking
Carefully place the roasting pan in the oven. Pour the boiling water into the roasting pan until it comes about halfway up the sides of the springform pan. Bake at 325°F (160°C) for 60 to 75 minutes.
Step 9: Check for Doneness
The cheesecake is done when the edges are set, but the center 2-3 inches still has a slight jiggle to it, like Jell-O. It will continue to cook and set as it cools.
Step 10: The Cooling Process
Turn the oven off completely. Crack the oven door open slightly (a wooden spoon can prop it open) and let the cheesecake cool in the oven for 1 hour. Then, remove the cheesecake from the oven and the water bath, take off the foil, and let it cool on a wire rack until it reaches room temperature.
Step 11: Chill Out
Once at room temperature, cover the cheesecake loosely with plastic wrap and refrigerate for at least 6 hours, but overnight is even better. This chilling time is essential for the cheesecake to set up properly and for the flavors to meld.
Substitutions and Variations
Feel free to get creative! This recipe is a fantastic base for many different flavors.
- Crust Variations: Swap graham crackers for crushed Oreo cookies (remove the cream filling), Biscoff cookies, or gingersnaps. For a gluten-free version, use gluten-free graham-style crackers or an almond flour crust.
- Flavor Twists: Add the zest of one lemon or orange to the batter for a citrusy kick. You could also swirl in 1/2 cup of raspberry or strawberry puree just before baking.
- Topping Ideas: This cheesecake is divine on its own, but a simple fruit compote, chocolate ganache, or salted caramel sauce takes it to another level.
Dietary Swaps and Nutrition
Here are a few ways to adapt the recipe and a general idea of its nutritional content.
| Nutrient | Approximate Amount |
|---|---|
| Calories | 550 kcal |
| Fat | 40g |
| Carbohydrates | 42g |
| Protein | 8g |
| For a… | Swap This | With This |
|---|---|---|
| Lower-Fat Version | Full-fat cream cheese & sour cream | Neufchâtel cheese & light sour cream |
| Keto/Low-Carb Version | Graham crackers & sugar | Almond flour crust & erythritol/monk fruit |
Make Ahead and Storage Tips
Cheesecake is the perfect make-ahead dessert, as it needs a long time to chill.
Make Ahead
You can bake the cheesecake up to 2 days before you plan to serve it. Keep it covered in the refrigerator. The flavor actually improves as it sits!
Leftovers and Storage
Store leftover cheesecake in the refrigerator, tightly covered, for up to 5 days. You can cover the springform pan with plastic wrap or transfer slices to an airtight container.
For longer storage, you can freeze it. Place the entire cheesecake or individual slices on a baking sheet and freeze until solid. Then, wrap tightly in plastic wrap and a layer of foil. It will keep for up to 2 months. Thaw it overnight in the refrigerator before serving.
Frequently Asked Questions
Here are answers to some questions you might have along the way.
Q1. Why did my cheesecake crack even with a water bath?
Ans: The most likely culprits are overmixing the batter after adding the eggs, or cooling it too quickly. Remember to mix on low speed and follow the slow cooling process exactly.
Q2. Is the cheesecake supposed to be jiggly in the middle when I take it out?
Ans: Yes, absolutely! A slight wobble in the very center is the sign of a perfectly baked cheesecake. It will finish setting up as it cools and chills. If it’s completely firm, it’s likely over-baked.
Q3. Can I make this without a springform pan?
Ans: It’s not recommended. A springform pan has removable sides, which is the only easy way to get a delicate cheesecake out of the pan without destroying it. It’s a worthwhile investment for any baker.
Q4. I forgot to take my ingredients out. Can I soften them quickly?
Ans: You can, but be careful. You can submerge the eggs (in their shells) and the sealed sour cream container in a bowl of warm water for 10-15 minutes. For cream cheese, you can unwrap the blocks, cut them into small cubes, and let them sit on a plate; they’ll soften much faster than a whole block.
Wrapping Up
There you have it. The path to a stunning, creamy, crack-free cheesecake isn’t paved with magic, just good technique and a little patience. The moment you take that first bite of a cheesecake you made from scratch, you’ll know it was worth every second.
That rich flavor and incredible texture are a reward in themselves. I hope you feel proud of your creation and enjoy sharing it with people you love.
I would love to see how your cheesecake turns out! Leave a comment below to share your experience or ask any questions that come up.


